Overview
This document can be referenced for functionality of the POSNext Web-Based Point of Sale.
POSNext Benefits:
- Ability to access the POS from office, home, or on the go using a desktop or tablet.
- No need for regular backups or remoting into a computer terminal for access
- Integration to TicketNetwork’s expansive inventory exchange – broadcast your inventory across multiple exchanges and numerous sites.
Logging in for the First Time
Once your POS Next account is configured you receive an email that contains a link to set your password. Clicking the link will bring you to the web page where you can set a new password.
Steps to log in for the first time
- Click the link from the email.
- Set your new password using the Web form.
- Click the save and return to login button.
Accepting the End User Licensing Agreement
The main account holder will need to accept the End User Licensing Agreement before being able to log on.
Logging in after your password has been set
To Login after your account is setup
- Open a web browser and type https://portal.ticketnetwork.com
- On the splash screen shown below click “Go to Login >” button

- This will bring you to the Application’s Landing Page (Shown Below)
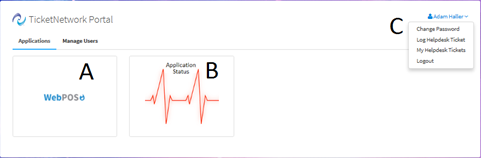
A. The WebPOS tile shown in the figure above, clicking on this will launch you into POSNext.
B. The Application Status Page – displays system operational health and highlights any connectivity issues.
C. Clicking on your name listed in the upper right hand corner exposes a menu with the following options
- Change Password
- Log Helpdesk Ticket
- My Helpdesk Tickets
Logout
POSNext Interface Break Down
POSNext has been designed with an easy to use interface in this section we will go over the general layout
- Header that contains loading status, and Session inactivity timer, and a rotating animation. All three of these components can be seen in the figure below.
![]()
A. Animated loading symbol – Spins as your current request is loading
B. Session Inactivity timer – Timer that counts down from 30 minutes, if no action is performed and this timer expires the user will need to re-authenticate to perform any actions
C. Loading progress bar – Progress bar fills in from left to right, once it reaches the end the loading has completed and the POSNext screen will be updated
The Navigation bar located on the left most side of the page, contains access to different functionality. The navigation bar is divided into 3 main sections as shown below.

A. Clicking the three horizontal lines icon on the navigation bar will compress the Navigation bar shown in Figure 2
While the menu is compressed, hovering over each different navigation option will display a message box explaining what that option does.
B. Clicking on your name will expand another set of menus
- Back to TN portal
- Log helpdesk Ticket
- Logout
C. In last section contains options to navigate to the different sections in POSNext, a light shading is applied to the section currently being displayed. The following sections are currently available.
- Inventory
- Events
- Orders
- Deliveries
- Customers
- Purchase Orders
The main POSNext grid is used to display relevant information. Each one is unique but generally follow the same layout. Below is a general overview of one such display.

A. Left side of grid headers contain access to other information, in this examples you can search for all events, or events that have tickets entered in Inventory.
B. Right side of grid headers contain access to search functionality, bulk actions, and filters
C. Grid Information, in some cases you can sort information in the grid by clicking on one of these headers.
D. Main information grid lists information under each header – To the right there are menu options that can perform actions on the information in each grid
Events Grid
Event Grid Header functionality
The events grid is composed of a header section that contains options to filter and show information in the main data grid.

A. The left most header contains the All Events filter, when selected a Blue line will underline the view and all events will be shown in the main data grid.
B. Events with My Tickets will only show events that contain your inventory when selected.

A. Using the Search by Event Name allows you to search events for a particular event, once you type in the event name you can search by pressing the enter key or clicking the Magnifying glass icon.
B. The Bulk Actions button gives you the ability to perform bulk actions such as adding tickets for multiple events. It will not be usable until multiple events are selected.
C. The Show Filters option allows you to filer events based on different criteria, clicking the Show Filters button exposes the filters menu.

a. Clicking the Hide Filters button hides the filters
b. Displays how many filters are currently being applied
c. Allows you to filter event listings based on the event name
d. Allows for filtering based on venue name
e. Allows for filtering based on city
f. Allows for filtering based on state
g. Allows for filtering based on abbreviated country name i.e. US for united states
h. Filter based on the number of your tickets
i. Allows for filtering based on the Total number of tickets listed
j. Allows for filtering based on a specific date range
k. Apply button, when clicked allows filtering of the events based on the inputted filters

- Once filters have been applied the show filters button of the header will show the number of filters currently being applied
- To clear the filters click on the button exposing the hide filters menu and click Clear
Event Data Grid
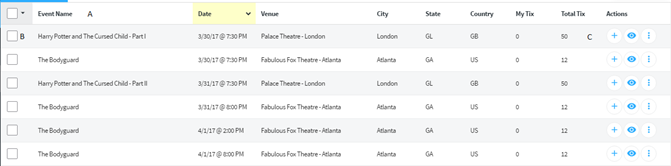
A. The data grid header labels the data found inside the data grid all columns except for the actions column and the unchecked check box give the ability to sort the information by the column. This is accomplished by clicking on the column label. Clicking the unchecked box selects all rows in the column.
B. Selecting the unchecked box next to a specific record will select that specific record.
C. The actions column contains additionally functionality such as the ability to add tickets, view inventory, and expose a menu with more options.
Adding Tickets Using the Event Grid
To add tickets for an event, locate the event and click on the icon with the plus sign which will bring you to the Add Tix screen (shown below)


The left side bar of the ticket screen is used to enter the ticket group windows, the right side shows ticket groups that are in the Add Ticket Queue.
Ticket Group Type – Denotes what type of ticket you are entering for the ticket group.

- Event Ticket
- Suite
- Parking
- Hotel
- Package
- Backstage Pass
- Pit Pass
- VIP Pass
- Meet/Greet Pass
- Pass
Seating Type – Denotes what seating type is for the ticket group

- Odd/Even
- Consecutive
- General Admission
Stock Type – Denotes stock type of tickets

- Standard
- E-Ticket
- Commemorative
- Paperless
- Flash Seats
Near Term Display
Denotes what near term option you would like to offer. For an explanation of what the near term is please see web admin
Default Website Setting
Description: Default Website Setting is used when the broker intends to work with the customer to inform them of a delivery option in the near term, some examples are will-call, local office, or courier.
Valid Stock Types: Standard, Commemorative, Paperless
Will Call
Description: Tickets will be available for pickup at will-call
Valid Stock Types: Standard, Commemorative, E-Ticket
Local Pickup Near Venue
Description: Tickets will be available for local pickup near venue
Valid Stock Types: Standard, E-Ticket, Commemorative, Paperless
E-Ticket
Description: Tickets will be available for instant download or email
Valid Stock Types: E-Ticket
Paperless
Description: Paperless tickets will be available by meeting buyer at venue
Valid Stock Types: Paperless
Electronic Transfer
Description: Tickets are available via electronic transfer, this is used for flash seats
Valid Stock Types: Flash Seats
Near Term Display option
Determines when the near term should be displayed
Always show near-term shipping
Description: This display option will allow the customer to choose the near term option even if the event is not currently in the near term.
Only show near-term Shipping
Description: This display option will only show the customer the near term delivery option. I.E. if you only want to offer E-Ticket delivery for near term and non-near term.
Split Options
Determines the valid split options on a ticket group, designed to not allow a single ticket to be left in a ticket group.
Standard Split Rule
Description: Standard split rule will allow the sale of pairs
All Splits
Description: All Splits allows the sales of single tickets
Seating Information
Section
Description: The section listed on the tickets
Row
Description: The Row listed on the tickets
Qty
Description: The quantity of tickets you have
Low Seat
Description: The lowest seat number
On Hand?
Description: Denotes if the tickets are on hand
NOTE: On-Hand Date – Calendar that allows you to choose the on-hand date
Hide Seat Numbers
Description: If checked, seat numbers will be hidden
Pricing
Wholesale
Description: The price you are selling each ticket for.
Cost Per Ticket
Description: The price you paid for each ticket
Face
Description: The face value on the tickets
Total Cost
Description: Calculated cost of the ticket group (Quantity X Cost)
Add Exchange Notes+
Adding an exchange note can be accomplished by clicking Add Exchange Notes+
![]()
Using the following screen, you have the ability to search for and add notes for the exchange. In the example below I have searched for notes containing limited, and selected 2 notes by clicking the check boxes located on the left hand side of the notes. You are able to add the notes by clicking on add notes with one or more notes selected.
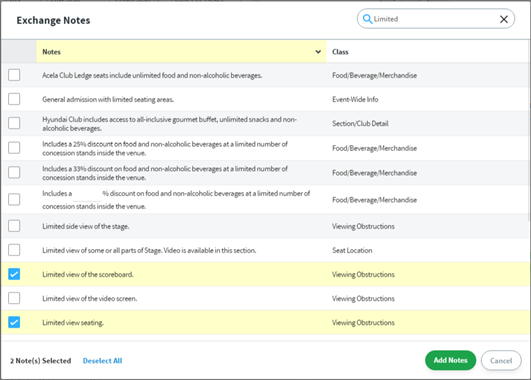
Once one or more notes have been added, you can view the notes by clicking exchange notes, edit the notes by clicking the pencil icon, or clear the notes by clicking the X

Broadcast To
TicketNetwork
Description: If selected the ticket group will be automatically broadcast on the TicketNetwork Exchange
Export
Description: If selected the ticket group will be automatically broadcast to external ticket exchanges
Add Tickets +
Description: Once you are satisfied with the ticket group information using the Add Tickets + button will allow you to add the ticket group to the tickets Queue
How to Purchase Tickets via Mercury
- Log into the web POS. You should be brought to the “events Tab”
- On the left hand side of the page, click In the search bar to search for the event that you would like to purchase tickets.

- Look for the section/row you are interested in.
- On the right hand side of the list, Click the “Mercury” dropdown.
- Click “Add to inventory” to bring up the purchase confirmation window
- Select the quantity you would like to purchase, the desired selling price, and which channels to broadcast your inventory. If you would like to keep your inventory private, uncheck the all the broadcast channels. Confirm your shipping info, then click “confirm sale”
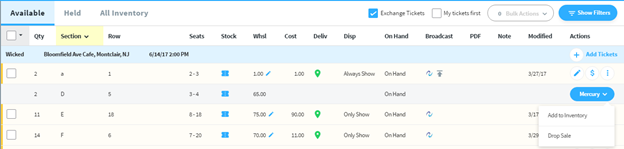
- The tickets should now be in your inventory.
Navigation
Timer
For security reasons, POSNext will automatically log out after 30 minutes of inactivity. The timer will automatically extend when performing an action that loads a new page or refreshes an existing page. Note: clicking on the top tabs that are already open will not extend the browser session.
Tabs
Navigation tabs allow for a user to switch between different screens without having to reload the page. A user will pick up from the exact position he/she left off. There is no limit on the number of tabs a user can open.
When a tab is no longer used, it can be closed by clicking the X button in the upper right hand corner of the tab.
When there are more tabs open than available screen width, additional tabs are hidden. They can be viewed by clicking the Arrow button, which triggers the slide-out menu that exposes the additional tabs.
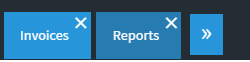

Multiple tabs can be closed by the dropdown in the upper right hand corner of the blue bar. A user can close the current tab, tabs that are not in focus, or all tabs.
